Lesson 0.1: Binary Exploitation and the Life Cycle of a Bug
This lesson answers one question, namely what pwn is and how does a small bug in a C program turn into the ability to run commands as the attacker. After reading it you will have a picture of the whole path and know where each later part of the series fits.
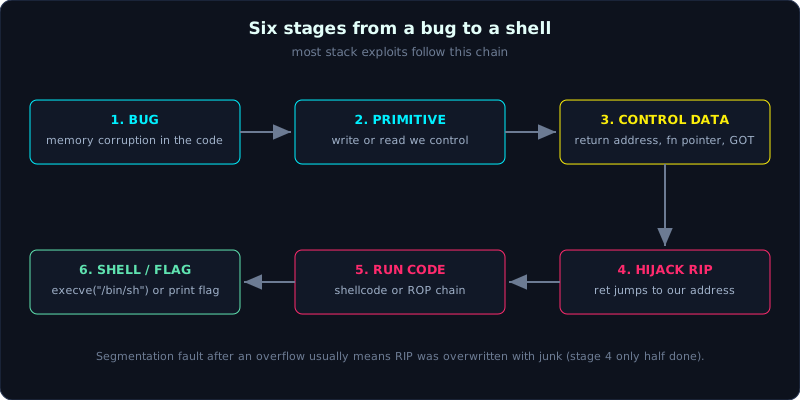 The six stages of a classic stack exploit, from the bug to a shell or flag.
Part: 0 · Time: about 40 minutes of reading plus lab · Difficulty: easy
Prerequisites: you can read C (pointers, arrays, functions) and have used a Linux command line. You do not need assembly yet, later lessons review it.
Tools: gcc, a Linux shell, checksec (installed in Lesson 0.2). This lesson is mostly reading and running one small program.
Goals
After this lesson you should be able to explain binary exploitation in your own words, list the 6 stages from a memory corruption bug to a shell, tell reverse engineering and pwn apart, explain why we study Linux x86-64, and compile a vulnerable program and watch it crash.
1. Theory
What pwn is
Binary exploitation, called pwn for short, means feeding data to a compiled program so that it does something its author never intended. “Binary” means we work directly with the executable file and with memory at runtime, not with the source code of a web app or an API.
The end goal is usually one of two things. The first is a shell, a command line session running with the privileges of the victim process. The second is reading a secret value we should not have access to. In a CTF (Capture The Flag, a security competition made of puzzles) that value is the flag.
The key point, and what separates pwn from other areas, is that we do not abuse a feature. We abuse the fact that the program manages memory incorrectly. A pointer writes past the place it is allowed to write, a memory region is reused after it was freed, a format string is controlled by the user. These bugs are called memory corruption. They do not just produce a wrong result. They break the boundary between data and code.
Why a memory bug is so dangerous
Code and data share one address space. The address the CPU will execute next is also just a number stored somewhere in memory. If we can overwrite that number, we decide where the program goes. Stripped down, the whole field is about gaining control over that number, the RIP register (Instruction Pointer, which tells the CPU the address of the next instruction to execute).
The life cycle of an attack: from bug to shell
Almost every classic stack exploit goes through the 6 stages below. Keep this frame in mind. The later parts of the series each go deep into one stage.
1
2
3
4
5
6
7
8
9
10
11
12
13
14
15
16
  [1] BUG            a memory corruption bug exists in the code
       |             (buffer overflow, use-after-free, format string...)
       v
  [2] PRIMITIVE      turn the bug into a usable "capability":
       |             write N attacker-controlled bytes somewhere / read a memory region
       v
  [3] CONTROL DATA   use that capability to overwrite a piece of control data:
       |             saved return address, function pointer, or GOT entry
       v
  [4] HIJACK RIP     on the next ret / function call, the CPU jumps to an address we choose
       |
       v
  [5] RUN CODE       run our code: shellcode, or a chain of gadgets (ROP)
       |
       v
  [6] SHELL / FLAG   execve("/bin/sh") for a shell, or print the flag
The stages in more detail:
Stage 1, the bug. Somewhere in the program there is a place that handles memory carelessly. The classic example is a function that reads user input into a fixed 64 byte array without checking the length. If we send 200 bytes, the extra 136 bytes spill out of the array. That is a buffer overflow.
Stage 2, turning the bug into a primitive. A primitive is a basic capability that we control. There are two kinds: write (put data of our choice at some address) and read (get the contents of some memory region out to us). A buffer overflow gives a sequential write, because we keep overwriting the bytes that follow the array. A good bug gives a strong primitive (write anywhere, any number of bytes).
Stage 3, reaching control data. Among the bytes we can overwrite, some are ordinary data and overwriting them gets us nothing. Others are control data: the saved return address (the return address stored on the stack, which says where to go when the current function finishes), a function pointer, or a GOT entry (a slot in the table of library function addresses, covered in Lesson 1.3). Overwriting these is what makes the write useful.
Stage 4, hijacking control flow. Control flow is the order in which the CPU runs instructions. When the current function executes ret, the CPU loads the saved return address from the stack into RIP and jumps there. If we have replaced the saved return address with our own address, the CPU jumps where we want. This is the decisive moment, and from here the program follows the attacker’s plan.
Stage 5, running our code. There are two approaches. One is to place shellcode (hand written machine code, usually calling execve to open a shell) in memory and jump to it. This works when the stack still allows execution. The other is for the case where the stack is not executable (the NX mitigation). Then we do not inject new code. We reuse pieces of code already in the program and chain them together, which is called ROP (Return-Oriented Programming). Both approaches get their own parts later in the series.
Stage 6, the result. Our code runs. Usually it calls execve("/bin/sh", ...) to start a shell, or it simply opens the flag file and prints it.
Not every challenge needs all 6 stages. Some bugs let us read the flag directly with no hijack at all. Still, this is the backbone. When you are stuck, ask yourself which stage you are stuck at.
How pwn differs from reverse engineering
Beginners often mix the two up.
Reverse engineering (RE) is about understanding. We have a binary with no source, and we use a disassembler and a debugger to rebuild what it does: what the algorithm is, how data flows, what the checks are. The product of RE is knowledge.
Pwn is about turning a weakness into a working attack. We find a weak point and build a specific input (called a payload, the data package that carries the attack) that makes the program fail in the way we want. The product of pwn is a working exploit that gives a shell or a flag.
They overlap a lot. To pwn a binary you almost always have to reverse it first: you need to read the code to know which function reads input, where the buffer is, whether there is a hidden win() function, and which mitigations are on. RE is the reconnaissance step and pwn is the attack step. In this series we do only as much RE as pwn requires, and we do not treat RE as a goal by itself.
The attacker model
Before every lesson, ask three questions. Together they form the attacker model, the set of assumptions about what the attacker can do.
One, what do I control. Usually it is input to the program: stdin, command line arguments, a network connection. Our primitive comes from the place where this input meets a bug.
Two, what do I want. A shell? Reading a file? Changing a variable to pass a check?
Three, where am I. Local means running on the same machine as the binary, which is easy to debug and lets us inspect memory freely. Remote means the binary runs on the organizer’s server and we only send bytes over a socket and see nothing else. The standard workflow is to build the exploit locally and then move it to remote. The most common failure is an exploit that works locally and fails remotely, usually because the library versions differ. We will meet this many times.
A note on ethics and scope
In this series you practice only on binaries you compile yourself, on public CTF challenges, or on systems you are authorized to test. Using these techniques on someone else’s software or servers without permission is illegal. Do not do it.
2. Demo
We do not exploit anything in this lesson. We build a minimal vulnerable program, make it crash, and point at the place that later parts will turn into control of RIP.
The sample program, saved as crackme.c:
1
2
3
4
5
6
7
8
9
10
11
12
13
14
#include <stdio.h>

void vuln(void) {
    char buf[64];          // 64-byte buffer on the stack
    puts("Type something: ");
    gets(buf);             // gets() reads with no length limit -> this is the bug
    printf("You typed: %s\n", buf);
}

int main(void) {
    vuln();
    puts("Finished normally.");
    return 0;
}
The bug is gets(buf). The function gets reads until it sees a newline and has no idea that buf holds only 64 bytes. If we type more, it keeps writing past the end.
Compile with some defenses turned off so the behavior is easy to observe (Lesson 0.3 and Part 5 explain these flags in full):
1
2
gcc -fno-stack-protector -no-pie -o crackme crackme.c
# gcc will warn: warning 'gets' is dangerous. That is correct, and it is exactly what we want.
Run it with short input and everything is normal:
1
2
3
4
$ echo "hello" | ./crackme
Type something:
You typed: hello
Finished normally.
Now send a long string, for example 200 A characters:
1
2
3
4
$ python3 -c 'print("A"*200)' | ./crackme
Type something:
You typed: AAAAAAAAAAAAAAAAAAAAAAA... (200 A characters)
Segmentation fault (core dumped)
Notice that the line “Finished normally.” is not printed. The program died partway, right when vuln tried to return to main.
What does the crash mean? The 200 A bytes overflowed buf and overwrote the stack area after it, including the saved return address of vuln. Instead of a valid address inside main, it now holds only 0x41 bytes (the ASCII code of the letter A). When vuln reaches ret, the CPU loads 0x4141414141414141 into RIP and jumps there. That address is not mapped to any valid memory, so the kernel stops the process. That is the Segmentation fault.
In later parts we replace this harmless 0x41 with a chosen address: the address of a win() function, of shellcode, or of the start of a ROP chain. In other words, we just watched stages 1 to 4 of the life cycle happen in under a second.
Finally, check which defenses this binary has (this needs checksec, installed in Lesson 0.2):
1
2
3
4
5
6
$ checksec --file=crackme
    Arch:     amd64-64-little
    RELRO:    Partial RELRO
    Stack:    No canary found        <- no canary, the overflow is not detected
    NX:       NX enabled             <- the stack cannot execute code, so we will need ROP later
    PIE:      No PIE (0x400000)       <- the .text address is fixed, easy to target
You do not need to understand every line yet. Part 5 is devoted to them. For now, see that each line is a lock, and our job in later lessons is to know which locks are open so we can choose the right technique.
3. Lab
There is nothing to download. Compile the snippet above yourself and experiment.
- Task: find roughly how many bytes you must enter before the program starts to crash, and explain how that number relates to
buf[64]. - Goal: get a feel for the boundary between “input fits, runs fine” and “input overflows, crashes”.
- Hints, open them one at a time:
- Hint 1: try the lengths 64, 72, 80, 96, 120 in turn. Use
python3 -c 'print("A"*N)' | ./crackmeand change N. - Hint 2: the crash point is not exactly 64. Between the end of
bufand the saved return address there are other things (the saved RBP, alignment padding). You will learn to compute the exact number in Lesson 3.2. - Hint 3: after the crash, run
dmesg | tail -3to see the faulting address that the kernel logged. Or enable core dumps withulimit -c unlimited, open the core file withgdb ./crackme coreand typeinfo registers rip. You will see RIP filled with 0x41 bytes.
- Hint 1: try the lengths 64, 72, 80, 96, 120 in turn. Use
- Self check: can you answer why a 200 byte input makes RIP equal to 0x4141414141414141, and if you controlled RIP, where would be a sensible place to jump next?
4. Key takeaways
- Pwn manipulates a binary’s memory and execution flow. It does not abuse a feature.
- The whole field comes down to gaining the ability to write to RIP, directly or indirectly.
- The life cycle has 6 stages: bug, primitive, control data, hijack RIP, run code, shell/flag.
- RE is for understanding and pwn is for building the attack. Pwn almost always needs RE first.
- Before each lesson ask the attacker model questions: what I control, what I want, local or remote.
- A Segmentation fault after an overflow usually means RIP was overwritten with junk.
5. Common pitfalls
- Thinking pwn is web hacking or key cracking. It is not. Pwn is about the memory of native processes. Key cracking is a branch of RE, and web hacking is a different field.
- Confusing “the program crashed” with “the exploit worked”. A crash is only stage 4 half done (RIP overwritten with uncontrolled junk). A real exploit overwrites RIP with a chosen address and the program runs the way you intend.
- Jumping straight into shellcode and ROP and skipping the foundations. The six stages depend on understanding the stack and the calling convention. Without that you copy exploits without understanding them, and you get stuck as soon as a challenge changes one small detail.
- Forgetting that local differs from remote. An exploit that works on your machine may fail on the server, and the number one cause is a different libc version. Keep this in mind from day one.
6. Further reading
- “Smashing The Stack For Fun And Profit” (Aleph One, Phrack 49): the classic article that started the field. The syntax is dated but the ideas still hold.
- pwn.college, the “Program Interaction” and “Memory Errors” modules: a free and well structured course that fits well alongside this series.
- LiveOverflow, the “Binary Exploitation / Memory Corruption” playlist on YouTube: useful for a visual intuition of the stages above.
- ROP Emporium: a set of challenges from ret2win to ROP, used often in Part 3 and Part 6.