Lesson 0.2: Setting Up a Pwn Lab with Ubuntu, pwntools, pwndbg and glibc
This lesson sets up a clean and consistent pwn environment for the whole series: Ubuntu or Docker, pwntools, gdb with pwndbg, and the supporting tools. It also explains why the glibc version can decide whether your exploit works or not.
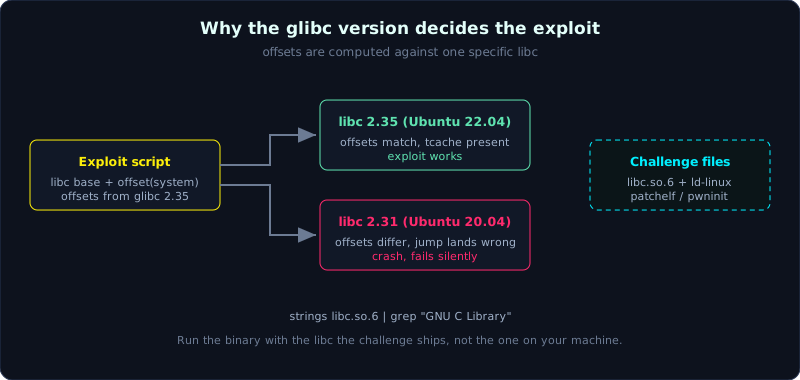 An exploit computes offsets against one libc version. A different version gives wrong addresses.
Part: 0 · Time: about 50 minutes of reading plus installation · Difficulty: easy
Prerequisites: Lesson 0.1. Basic Linux terminal use (apt, cd, git).
Tools: Ubuntu LTS (or Docker), python3 with venv, pip, git, gdb, gem (ruby). Everything is installed in this lesson.
Goals
After this lesson you should have an Ubuntu 22.04 (glibc 2.35) environment running on a VM, WSL2 or Docker, pwntools installed in its own virtual environment, and gdb showing the pwndbg prompt with vmmap and checksec working. You should also be able to explain why the glibc version matters and find the glibc version of your machine and of an unknown libc.so.6 file.
1. Theory
Why use a separate lab
Pwn touches many glibc versions. glibc is the GNU C standard library, the core that most Linux binaries link against. Today you solve a challenge built on glibc 2.27 and tomorrow one on 2.35, and each behaves differently. If you install everything into your main system, you pollute it, you hit version conflicts, and cleaning up is a hassle. Isolating the environment is the right habit from the start.
There are two ways to isolate, and both work well.
A virtual machine (VM) or WSL2 running Ubuntu. The advantage is that it behaves like a real Linux machine, gdb runs smoothly, and you can change kernel settings freely (such as turning off ASLR). The drawback is that it is a bit heavier than Docker. WSL2 is convenient on Windows and costs almost nothing.
Docker. The advantages are that it is light, reproducible, and good for keeping several glibc versions side by side (an Ubuntu 18.04 image for glibc 2.27 and a 22.04 image for 2.35). The drawbacks are that debugging inside a container needs extra flags (--privileged or --cap-add=SYS_PTRACE so that ptrace works), and GUI work is awkward.
In practice, use Ubuntu 22.04 LTS as the main environment for this series. It ships glibc 2.35, which is modern enough (it has tcache and the default mitigations) and still has plenty of documentation. When a challenge needs a different glibc, build a separate Docker container with that version. A single standard environment makes every command in the series produce the output the lessons describe.
Why pick one LTS release
Each Ubuntu release pins a glibc version:
1
2
3
4
Ubuntu 18.04  ->  glibc 2.27
Ubuntu 20.04  ->  glibc 2.31
Ubuntu 22.04  ->  glibc 2.35   (recommended for this series)
Ubuntu 24.04  ->  glibc 2.39
This number is not a minor detail. It changes how the heap works, it changes function offsets inside libc, and it changes whether an exploitation technique works at all. So when you read a write-up and the exploit does not run for you, the first question is always which glibc they used and which one you are using.
Why the glibc version decides whether an exploit works
This is the most important part of the lesson, so read it carefully. Many pwn techniques depend directly on libc.
Function offsets in libc. In ret2libc lessons (calling a function that already exists in libc, such as system("/bin/sh")), you leak an address inside libc and compute the libc base by subtracting an offset. The offsets of system, of the string "/bin/sh", and of every other function DIFFER between glibc versions. If you apply glibc 2.31 offsets to glibc 2.35, you get completely wrong addresses, the exploit jumps to an invalid place, and the program crashes.
Chunk structure and the existence of tcache. Heap exploitation depends on the layout of a chunk (the unit malloc allocates) and on the bins (lists of free chunks). tcache (a per-thread cache of chunks) appeared in glibc 2.26. Many heap techniques only apply when tcache exists, and many others were patched in newer versions (for example the double free checks added in 2.29 and 2.32). The wrong version means the wrong family of techniques.
one_gadget constraints. one_gadget is a tool that finds an address inside libc where a single jump gives a shell. Each gadget comes with constraints (conditions on registers or on values on the stack), and both the address and the constraints change with every libc build.
In short, your exploit logic can be completely correct, but if it runs against the wrong libc, all addresses are shifted and it fails silently and confusingly. This is the number one cause of “works locally, fails remotely” that Lesson 0.1 warned about.
Running a binary with the challenge’s libc
When a CTF challenge ships a libc.so.6 (and often ld-linux-x86-64.so.2, the dynamic loader), you must run the binary with exactly that pair and not with the libc of your machine. A few concepts:
The loader (ld.so) is the program the kernel starts first when running a dynamic binary. It loads the libraries and resolves addresses. The binary stores the path of its loader (the interpreter) and the list of libraries it needs.
patchelf is a tool that edits that information inside the ELF file without recompiling. It can point the interpreter to the challenge’s loader and change the rpath so the challenge’s libc is found first. The idea:
1
patchelf --set-interpreter ./ld-2.35.so --set-rpath . ./chall
In practice people rarely type this by hand. pwninit downloads the matching loader, patches the binary, unstrips the libc, and generates a template script. glibc-all-in-one is a collection that downloads many libc and loader pairs by version. The series has a dedicated lesson for this workflow in the ret2libc part. For now, remember that the binary must run with the libc your exploit’s offsets are based on.
A quick way to find the version of a libc file:
1
2
strings libc.so.6 | grep "GNU C Library"
# -> GNU C Library (Ubuntu GLIBC 2.35-0ubuntu3.4) stable release version 2.35.
2. Demo
We build the lab from scratch on Ubuntu 22.04. If you use WSL2, install the Ubuntu-22.04 distribution from the Microsoft Store and follow the same steps.
Step 1: system packages
1
2
3
4
sudo apt update
sudo apt install -y build-essential gdb python3 python3-pip python3-venv \
                    git ruby-full patchelf file
# build-essential: gcc + make. gdb: debugger. ruby-full: to install one_gadget through gem.
Step 2: pwntools in a virtual environment
A virtual environment (venv, an isolated Python environment) keeps pwntools and its packages apart from the system Python. It avoids conflicts and avoids sudo pip, which you should not use:
1
2
3
4
python3 -m venv ~/pwnenv            # create a venv named pwnenv
source ~/pwnenv/bin/activate        # activate it, the prompt changes to (pwnenv)
pip install --upgrade pip
pip install pwntools
Check that the import works:
1
2
python3 -c "from pwn import *; print('pwntools', pwnlib.__version__, 'OK')"
# -> pwntools 4.x.x OK
Every time you open a new terminal for pwn work, run source ~/pwnenv/bin/activate again. If you do not want to type it, add an alias to ~/.bashrc.
Step 3: gdb and pwndbg
Plain gdb is hard to read. pwndbg is a plugin that turns gdb into a proper pwn tool. It prints registers, the stack and the disassembly each time the program stops, and adds commands such as vmmap, checksec and heap:
1
2
3
git clone https://github.com/pwndbg/pwndbg ~/tools/pwndbg
cd ~/tools/pwndbg
./setup.sh          # the script installs dependencies and writes to ~/.gdbinit
An alternative is GEF, a similar plugin that some people prefer. Do not install both at once because they compete for ~/.gdbinit. This series uses pwndbg by default. If you are used to GEF, keep using it, the commands are similar.
Check it:
1
2
gdb -q /bin/ls
# The prompt should be colored: "pwndbg>" instead of "(gdb)". Type "vmmap" to try it, then "quit".
Step 4: the supporting tools
1
2
pip install ROPgadget ropper            # inside the active venv
gem install --user-install one_gadget   # ruby, you may need to add ~/.gem/ruby/.../bin to PATH
One sentence on what each tool does:
- checksec: shows which mitigations a binary has (NX, PIE, canary, RELRO). It comes with pwntools, call it with
pwn checksec <file>or use it in a script. - ROPgadget and ropper: list gadgets (short instruction sequences ending in
ret) used to build a ROP chain. They have the same purpose and different interfaces, so keep both. - one_gadget: finds the addresses in libc that give a shell, together with their constraints.
- patchelf: changes the interpreter and rpath so a binary runs with a chosen libc (covered in section 1).
Step 5: test the whole chain
1
2
3
4
5
6
7
8
9
cat > test.c <<'EOF'
#include <stdio.h>
int main(void){ puts("hello pwn lab"); return 0; }
EOF
gcc -o test test.c
./test                                   # -> hello pwn lab

python3 -c "from pwn import *; e=ELF('./test'); print(e.checksec)"
# Prints the RELRO/Stack/NX/PIE table: if you see this table, pwntools + ELF work end to end.
Open gdb one last time to confirm pwndbg works:
1
2
3
4
gdb -q ./test
pwndbg> start      # run to the start of main and stop
pwndbg> vmmap      # show the memory map of the process
pwndbg> quit
At this point the lab is finished.
Optional: a Dockerfile for container users
Save it as Dockerfile, then run docker build -t pwnlab . and docker run --rm -it --cap-add=SYS_PTRACE pwnlab:
1
2
3
4
5
6
7
8
9
10
11
FROM ubuntu:22.04
ENV DEBIAN_FRONTEND=noninteractive
RUN apt-get update && apt-get install -y \
      build-essential gdb python3 python3-pip python3-venv \
      git ruby-full patchelf file && \
    pip3 install pwntools ROPgadget ropper && \
    gem install one_gadget && \
    git clone https://github.com/pwndbg/pwndbg /opt/pwndbg && \
    cd /opt/pwndbg && ./setup.sh
WORKDIR /work
CMD ["/bin/bash"]
The --cap-add=SYS_PTRACE flag is required so that gdb can ptrace a process inside the container.
3. Lab
- Task: build the lab by following the instructions, verify each piece yourself, then practice identifying a glibc version.
- Goal: stop depending on the article and be able to bring the environment up on your own at any time.
- Self-check list (answer yes or no):
- Does
from pwn import *run without errors? - Does
gdbopen with thepwndbg>prompt, and doesvmmapgive output? - Does
pwn checksec ./testprint the mitigation table? - Do you know which glibc your machine has? Run
ldd --version | head -1.
- Does
- Small version exercise: get a
libc.so.6of a different version (for example from an Ubuntu 18.04 Docker image, or from glibc-all-in-one), then:- Hint 1:
strings libc.so.6 | grep "GNU C Library"to read the version string. - Hint 2: compare it with
ldd --versionon your machine. Do the two numbers match? If not, this is exactly the situation where you will need patchelf in the ret2libc part. - Hint 3: try
file ./binary_nameto see whether it is dynamic or static and which interpreter it requires (readelf -l ./binary_name | grep interpreter).
- Hint 1:
- Self check: can you explain why running a challenge with your machine’s libc instead of the libc they ship can make an exploit fail?
4. Key takeaways
- Always do pwn work in an isolated environment (VM, WSL2 or Docker). Do not install things carelessly on your main system.
- Ubuntu 22.04 is glibc 2.35 and is the standard for this series. For challenges with another version, build a separate container.
- Install pwntools in a venv and activate it again in each session.
- gdb must start with the pwndbg prompt and have
vmmapandchecksec. - The glibc version decides function offsets, chunk structure, tcache and one_gadget. The wrong version breaks all of them.
- A challenge binary must run with the libc and loader they ship, not the libc of your machine.
5. Common pitfalls
- Installing pwntools with
sudo pip installinto the system Python. It can break the environment and is hard to undo. Use a venv. - Installing both pwndbg and GEF and then seeing random gdb errors. They overwrite each other’s
~/.gdbinit. Pick one. - gdb in Docker printing “ptrace: Operation not permitted”. The
--cap-add=SYS_PTRACEflag (or--privileged) is missing indocker run. - Forgetting
source ~/pwnenv/bin/activatein a new terminal and then being surprised by a ModuleNotFoundError onfrom pwn import *. - Running a challenge with your machine’s libc and concluding the exploit logic is wrong, when the real problem is a libc mismatch. Check the version before you doubt the logic.
- Forgetting that ASLR and ptrace settings in the kernel affect debugging. Labs in WSL2 or Docker sometimes have different defaults from a real machine. If results look odd, check
cat /proc/sys/kernel/randomize_va_space.
6. Further reading
- The official pwntools documentation (docs.pwntools.com): read Getting Started and Tubes.
- The pwndbg README on GitHub: the command list and configuration.
- glibc-all-in-one (matrix1001’s repository): downloads libc and loader by version, used often in the ret2libc part.
- pwninit (io12’s repository): automates patching a binary with the challenge libc, worth installing in advance.
- Any blog post you like about “setting up a pwn environment”. Compare a few to see how people tune their setups differently.